Mobile Tutorial: Using FireDAC in Mobile Applications (iOS and Android)
This tutorial describes the basic steps to use SQLite as a local data storage on your mobile device through the FireDAC framework.
| iOS | Android |
|---|---|
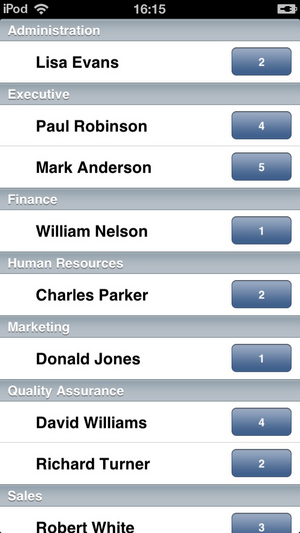 |
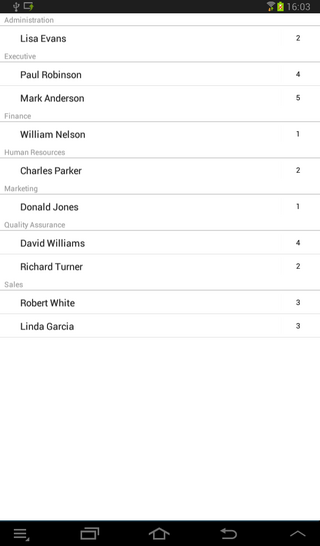
|
Using FireDAC to Connect to the Database
FireDAC is a unique set of Universal Data Access Components for developing cross-platform database applications for Delphi and C++Builder. With its powerful common architecture, FireDAC enables native high-speed direct access from Delphi to InterBase, SQLite, MySQL, SQL Server, Oracle, PostgreSQL, IBM DB2, SQL Anywhere, Access, Firebird, Informix, and more.The FireDAC native driver supports SQLite database version 3.0 and later. For a detailed discussion on SQLite usage in FireDAC for a Delphi application, read the "Using SQLite with FireDAC" article.
To use SQLite in your application, the sqlite3.dll file must be present on your development system. If this file is not present, download sqlite3.dll from http://www.sqlite.org/download.html to your system path (such as C:\Windows\SysWOW64 for 64-bit Windows).
Design and Set Up the User Interface
Create a new project. Choose a FireMonkey Mobile Application.- Drop a TFDConnection component on the form.
- Right click the TFDConnection component and choose Connection Editor.
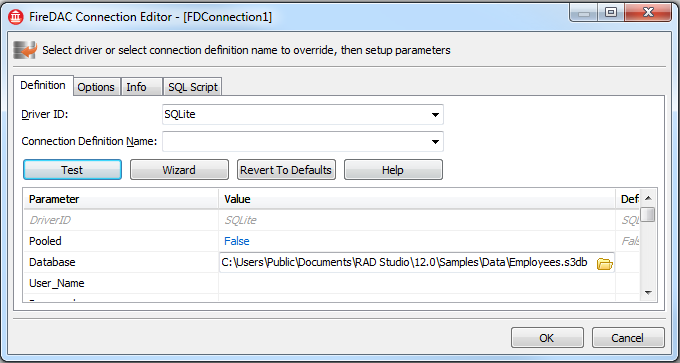
- In the FireDAC Connection Editor, set the following parameters of the TFDConnection:
- Set the Driver ID property to SQLite.
- Set the Database parameter to:
- Click the Test button to test the connection.
- Click OK to close the Connection Editor.
- In the Object Inspector, set the following properties of TFDConnection:
- Set the LoginPrompt property to False, so that the user is not prompted for a login.
- Set the Connected property to True.
Using the LiveBindings Wizard
Use the LiveBindings Wizard to add the LiveBindings components (TBindSourceDB, TBindingsList), TFDQuery, and the TListView component.Add the LiveBinding components
- Select View > LiveBindings Designer and the LiveBindings Designer opens.
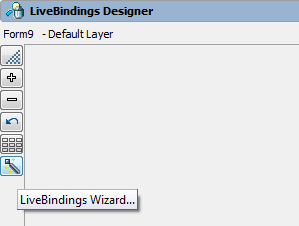
- Select LiveBindings Wizard.
- Select Create a data source binding task.
- Click the Next button.
- Select FireDAC class name.
- Click the Next button.
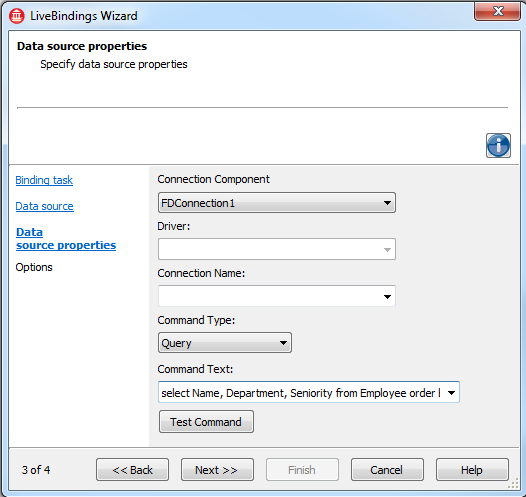
- Change the Command Type to Query.
- Set the Command Text property to
select Name, Department, Seniority from Employee order by Department. - Click the Test Command button.
- Click the Next button.
- Click the Finish button.
Add the ListView component
- Reopen the LiveBindings Wizard.
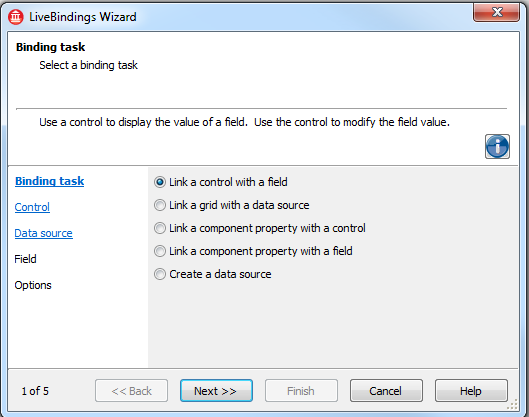
- Select Link a control with a field binding task.
- Click the Next button.
- Select TListView.
- Click the Next button.
- Select BindSourceDB1.
- Click the Next button.
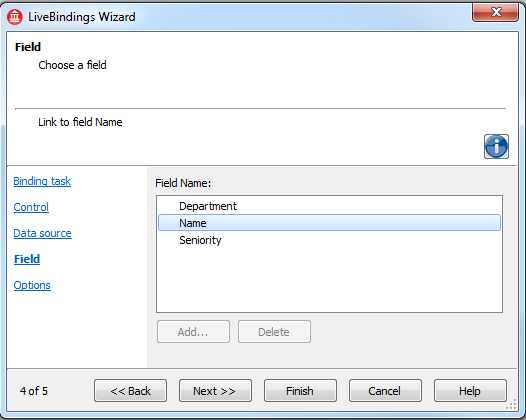
- Select Name Field Name.
- Click the Next button.
- Click the Finish button to close the wizard.
Using the LiveBindings Wizard
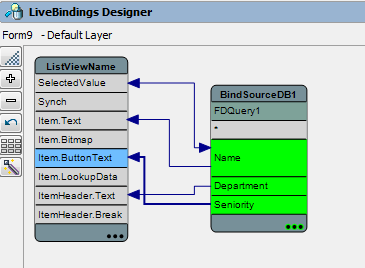
Use the LiveBindings Designer to add new connections between the TBindSourceDB and TListView components.- Select the ItemHeader.Text member from TListView.
- Bind to the Department member of the BindSourceDB1 component by dragging (a connection line appears).
- Select the Item.Text member from TListView.
- Bind to the Name member of the BindSourceDB1 component by dragging (a connection line appears).
- In the Object Inspector, set the following properties of TListView:
- Set the ItemAppearance to ImageListItemRightButton.
- In the LiveBindings Designer, the TListView should have a new member, Item.ButtonText.
- Set the Align property to alClient.
- Set the ItemAppearance to ImageListItemRightButton.
- In the LiveBindings Designer, select the Item.ButtonText member from TListView.
- Bind to the Seniority member of the BindSourceDB1 component by dragging (a connection line appears).
Preparing Your Application for Run Time
FireDAC has a loosely-coupled multilayered architecture, where layers provide services. A service API is defined as a COM interface that other layers can request using the interface factory.To properly operate FireDAC, you must link the implementation of the IFDGUIxWaitCursor and IFDPhysDriver interfaces to your application.
For this, drop the TFDGUIxWaitCursor and TFDPhysSQLiteDriverLink components on the form.
Setting Up Your Database Deployment for mobile
Up to this point, you have used SQLite on your desktop. This means that the actual database is located on your local hard disk drive (for example, C:\Users\Public\Documents\RAD Studio\12.0\Samples\Data\Employees.s3db). On the mobile Device, applications are sand-boxed, and typically you can only read and write data that is located in the Documents folder (for iOS device) and internal storage (for Android device) under your application folder.To connect to a local database on mobile, you need to perform the following actions:
- Deploy the database to the mobile Device.
- Change the configuration (to connect to the database file) to a local file under the Documents folder (for iOS device) or internal storage (for Android device).
Add and Configure Your Database File in the Deployment Manager
Before you can run your application on mobile, you need to set up the deployment for your database file (Employees.s3db).- Open the Deployment Manager by selecting Project > Deployment.
- Select Add Files and select the database file (for example, C:\Users\Public\Documents\RAD Studio\12.0\Samples\Data\Employees.s3db).
- Select Employees.s3db, and change Remote Path to StartUp\Documents\ (for iOS platform) or assets\internal\ (for Android platform).
- Select the Platforms column (double-click the ellipsis [...] in the row for Employees.s3db):
- Ensure that iOS Simulator and iOS Device or Android are present for Employees.s3db.
- Remove Win32 from the list if it is present (you do not have to copy database files to the Win32 platform).
- Select All-Configurations - iOS Device platform or All-Configurations - Android platform and make sure Employees.s3db is set to be deployed to StartUp\Documents\ or assets\internal\.
Modifying Your Code to Connect to a Local Database File on Mobile
The basic features of this application are now implemented. The database file used in this application was created on Windows and the file is not available on your mobile device unless you copy it to the mobile device or create it on the fly.Specifying the Location of the SQLite Database on the Mobile Device
- In the Form Designer, select the FDConnection1 component.
- In the Object Inspector, double-click the BeforeConnect event.
- Add the following code to this event handler:
procedure TForm1.FDConnection1BeforeConnect(Sender: TObject);
begin
  FDConnection1.Params.Values['Database'] := TPath.Combine(TPath.GetDocumentsPath, 'Employees.s3db');
end;
C++ (only for iOS):
void __fastcall TForm1::FDConnection1BeforeConnect(TObject *Sender)
{
   FDConnection1->Params->Values["ColumnMetadataSupported"] = "False";
   FDConnection1->Params->Values["Database"] = System::Ioutils::TPath::Combine(System::Ioutils::TPath::GetDocumentsPath(), "Employees.s3db");
}
Running Your Application on the Simulator or on the Mobile Device
Now your application is ready to run (select Run > Run).| iOS | Android |
|---|---|
 |

|




No comments:
Post a Comment